

How to waterproof electronics? Basically it’s a combination of cleaning, coating, encapsulation & housings. We’ve been deploying our loggers under water since 2013 and although I posted many detailed build tutorials along the way, it’s time to gather some of that distributed material into a summary of the techniques we use to make our loggers more reliable. This post will focus on options available to someone working with a modest budget and also include a few interesting methods we haven’t tried yet for reference. To put all this in context; we deploy our DIY loggers to typical sport diving depths and usually get solid multi-year operation from our underwater units.
The major sections of this post are:
Sealants , Encapsulation , Housings & Connectors , Other Protection Methods
Sealants
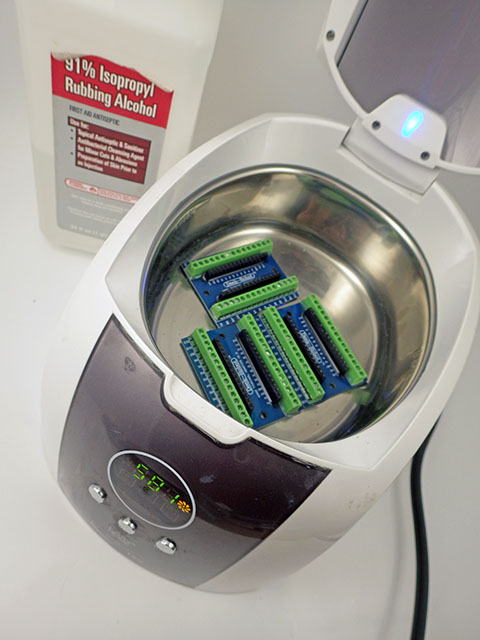
No matter what coating you use, everything must be scrupulously clean before it’s applied. Corrosion inducing flux is hydroscopic and there’s always some left hiding underneath those SMD parts – especially on cheap eBay modules. That means scrubbing those boards with alcohol and an old toothbrush, drying them with hot air & cotton swabs, and then handling by the edges afterward. Boards with only solid-state parts (like the ProMini) can be cleaned using an ultrasonic cleaner and 90% isopropyl but NEVER subject MEMS sensors or RTC chips to those vibrations. Polymer based RH sensors like the BME280, or MS5803 pressure sensors with those delicate gel-caps, also get careful treatment. After cleaning, let components to dry overnight in a warm place before you coat them with conformal. I clean new modules as soon as they arrive, and store them in sealed containers with desiccant.

MG Chemicals 422-B Silicone Modified Conformal Coating is the one we’ve used most over the years. Even with a clean board, adhesion to raised ICs can be tricky as surface tension pulls it away from sharp edges. Like most conformals, 422-B fluoresces under UV-A so a hand-held blacklight lets you check if it’s thin at some corner, or if you simply missed a spot. The RC/Drone crowd regularly report on many of the other options on the market like Corrosion-X, Neverwet, KotKing, etc. I’ve never seen a head-to-head test of how well the different conformals stand up over time, but the loggers we’ve retired after 5-6 years in service look pretty clean even though silicone coatings are not water vapour proof. I like the flow characteristics of 422 for our small scale application, though the vapours are nasty enough to make you wonder how much brain damage your project is really worth. You can also just burn the stuff off with a soldering iron if you need to go back for quick modification after its been applied. Conformals can be made from other compounds like acrylic or urethane, and at the top of the market you have vacuum-deposited coatings like Parylene.
Nail polish gets mentioned frequently in the forums and it’s usually a type of nitrocellulose lacquer. While it’s non-conductive and non-corrosive, acetate chemistry is not far off acetone which solvates a lot of stuff. So nail polish may soften some plastics and/or the varnish protecting your PCBs. It might also wipe the lettering off some boards. So the trick is to start with the thinnest layer possible and let that harden completely before applying further coats. Nail polish softens somewhat when heated above 200°C with a hot air gun enabling you to scrape it away if you need to rework something after covering. Overall it’s a good low-budget option that’s less complicated to apply than a UV cured solder mask solution.


You never get 100% coverage so the areas underneath components usually remain unprotected. But coatings really shine as a second line of defence that keeps your logger going when the primary housing suffers minor condensation or makes the unit recoverable after a battery leak. Even when we intend to pot a circuit completely, I still give it a thin coat of conformal to protect it during the week long burn-in test before encapsulation. (If you are using cheap sensors from eBay, expect ~20% infant mortality) Be careful not to let coatings wick onto metal contacts like those inside an SD card module or USB connector and remember to seal the cut edges of that PCB so water can’t creep between the layers.
The delicacy of application required when working with IC sensors means that spray-on coatings are usually a bad idea, but there are exceptions. Paul over at Hackaday reports success using clear acrylic spray paint as a kind of poor man’s Parylene after “comparing the MSDS sheets for ‘real’ acrylic conformal spray coatings, and acrylic paint. All that’s missing is the UV indicator, and the price tag.” He uses this technique in outdoor electrical boxes but the first thing that comes to my mind is coating the screw terminals inside most rain gauges (see photo at end of post), and the exposed bus-bars you see in some climate stations.
Potting / Encapsulation

Hot-melt Glue: Glue sticks come in a variety of different compounds. But it’s hard to know what’s in the stuff at your local hardware store so my rule of thumb is to just buy the one with a higher melting point. If you are gluing to something with a high thermal mass or a surface that can transfer heat (like copper PC board) the glue will freeze before it bonds. So preheating the item you are working on with a hot air gun before gluing is usually a good idea. I’ve used glue sticks for rough prototypes more times than I can remember, sometimes getting several months out of them before failure in outdoor locations. Cheaper no-name sticks tend to absorb a lot of water(?) and have more trouble sticking to PCB surface coatings. So it’s a temporary solution at best unless you combine it with something more resistant like heat shrink tubing. Add glue to what you’re sleeving, and it will melt and flow when you shrink – effectively a DIY adhesive lined heatshrink:

Hot glue is also quite handy for internal stand-offs or just holding parts together if they are too irregularly shaped for double-sided mounting tape to do the job. Isopropyl alcohol helps remove the glue if you need to start over.
Superglue & Baking Soda: These dollar-store items are perfect for sealing & repairing the polymer materials that most waterproof kit is made from. Adam Savage has a great demo of this on YouTube. That gusseting build-up technique is so fast it now accomplishes many of the things I used to do with hot glue. CA glue & spray-on accelerant can also be used to improve the strength of 3D prints, as demonstrated by the ever-mirthful Robert Murray-Smith. The sealed surface of your print can then be written on with a sharpie marker without the black ink bleeding into the PLA layers, although I also use clear mat-finish nail polish for this labeling.

Silicone Rubber comes in two basic types: ‘Acid cure’ which smells like vinegar and ‘Neutral cure’ which gives off alcohol while it hardens (often used in fish-tank sealants). Never use acid curing silicone on your projects. Hackaday highlighted a method using Tegderm patches to give silicone encapsulations a professional appearance although you can usually smooth things well enough with a finger dipped in dish detergent. In another Hackaday post on the subject, a commenter recommends avoiding tin-cured RTV silicones in favor of platinum cured which has longer lifespan and less shrinkage. Really thick silicone can take several days to cure but accelerants like corn-starch or reptile calcium powder can cut that to a few hours. It’s also worth knowing that silicones expand/contract significantly with temperature because this can mess with builds using pressure or strain sensors.

While silicone is waterproof enough for the duration of a dive it is NOT water-vapor proof. I often use GE Silicone II (or kafuter K-705) to seal around the M12 cable glands we use on student projects. However, water vapor eventually gets in when the housings “cool down & suck in moist air” causing condensation on the upper surface. Any container sealed with SR will eventually have an internal relative humidity comparable to the outside air unless your desiccants prevent that from happening. Always use desiccants with color indicator beads so you can see when they need to be replaced. Old desiccant pouches can be ‘recharged’ overnight in a food dehydrator and used ones can usually be found for ~$10 at your local thrift shop. Dehydrators are also great for reviving old filament if you have a 3d printer.
Liquid Epoxy: If money is no object, then there are industrial options like Scotchcast but many come in packaging that dispenses volumes far too large for a small batch of loggers. The best solution we could find at the start of this project was Loctite’s line of 50mL 2-part epoxies designed for a hand-operated applicator gun. Used guns can be found on eBay and there are plenty of bulk suppliers for the 21-baffle mixing nozzles at 50¢each or less. Loctite E-30CL has performed well over years of salt-water exposure on our PVC housings though it does fog & yellow significantly after about six months. Check the expiry date before buying any epoxy because they harden inside the tube when they get old. I’ve often received epoxies from Amazon that are only a month or two from expiring, so don’t buy too much at one time. And they don’t last long once you crack the seal, so I usually line up several builds to use the entire tube in one session.

My favorite use of liquid epoxy combines it with heat shrink tubing to make long strings of waterproof sensors:


We’ve deployed up to 24 DS18b20 sensors on a single logger running underwater for years – failing eventually when the wires broke inside intact cable jackets because of the bending they received over several deployments. This mounting takes a bit of practice, so have a roll of paper towels nearby before you start pouring and I usually do this over a large garbage can to catch any accidental overflow.

The 2-Part fiberglass resins used for boat repair are another good potting option though they are often opaque with unusual coloration. Low viscosity mixes can be applied with precision using disposable syringes. It’s important that you transfer the stirred resin into a second container before pulling it into the syringe because there’s often a poorly mixed layer stuck to the sides of the first mixing cup. 3D printed shells are often used as casting molds but if all you just need is a rectangular shape then I’d use a LEGO frame lined with plastic food wrap. You can make single-use molds that conform to unusual shaped objects with sheets of modeling clay. When encapsulating large volumes you can make that expensive epoxy go farther with ‘micro-balloon’ fillers made from tiny phenolic or glass spheres. I’ve used old desiccant beads for this many times. Other inert fillers like talc power are sometimes used the lower peak temps during the curing process because fast setting epoxies get quite hot – sometimes too hot to touch. And speaking of heat, all encapsulation methods open the possibility that high power components could cook themselves. So avoid covering any heat sinks when you pot your boards.
Filler / Paste Epoxies: J-B weld is good low-budget option for exposed sensor boards. This two part urethane adhesive bonds well to most plastic surfaces and the filler it carries gives a working consistency somewhere between peanut-butter and thick honey. This is helpful in situations where you want to mount something onto a relatively flat surface like the falcon tubes we use with our 2-part Mini Loggers:


Although the original grey formulation gets it’s color from metal filings it is an electrical insulator. The older style JB weld that comes in two separate tubes is slightly thicker than that sold with an applicator syringe. It’s also worth noting that the stuff really needs at least 24 hours to set – not the 6 hours they claim on the package. There is also a clear version that can be used to protect light sensors, but I’ve yet to field test that in harsh enough conditions to see how it ages:


Wax: I haven’t tried this yet but it sounds like it could be fun: Refined paraffin can be purchased in food grade blocks for sealing jars, etc. at most grocery stores and it flows well into small component gaps. It’s also removeable, however the 45°C melting point which makes this possible is too low for outside deployments where I’ve seen loggers reach 65°C under tropical sun. A tougher machinable-wax can be made at home by mixing LDPE (plastic grocery bags) or HDPE (food containers) into an old deep fryer full of paraffin wax. The general recipe is a 4:1 ratio of paraffin to LDPE/HDPE and this raises the melting point enough to withstand summertime heat. Or you could try Carnauba wax which has a melting point above 80°C. You probably want to do partial pours with any wax based approach as shrinkage can be significant. If I had to make something even more heat resistant I’d consider an asphalt-based roofing cement. That’s a one-way trip, but it should last quite a while outside.
If you’re spending company money, it’s worth noting that many professional potting compounds like those from 3M are sold in hot-melt glue stick formats [usually 5/8″(16mm) diameter rather than the more common hobby market 1/2″]. This dramatically reduces waste & mess compared to working with liquid epoxies. Of course, it’s unlikely a DIYer will be able to use them as the applicators alone can set you back $300 to $600 USD. Another factor to consider is the different expansion rates of the circuit you are trying to protect vs the compound you are using for the encapsulation: hard epoxies may cause electrical failures by subjecting components to more stress when the environment is cycled between extreme temperatures. In those cases it is probably better to use softer compounds.
Housings & Connectors
Although 3D printers are now affordable, we still use plumbing for our underwater housings so that others can replicate them with parts from their local hardware store. The design has changed significantly over time but this tutorial video from 2017 still stands as the best overall description of the ‘potting wells’ method we use to mount sensors on those PVC housings. It also shows how to make robust underwater connectors using PEX swivel adapters:
Smooth surfaces on the inside of those wells are scored with a wire brush or rough grit sandpaper before pouring the epoxy. After solvent welding, leave the shells to set overnight before adding epoxy because bad things happen when you mix chemistries. In fact, that’s a good rule for all of things listed in this post. Otherwise that expensive potting compound could turn into a useless rubbery mess. Another important thing to note is that we break the incoming wires with a solder joint that gets encapsulated before the housing penetration. This is more reliable than cable glands because water can’t wick along the wires if the jacket gets compromised. The shell shown in that video uses a Fernco Qwik-Cap as the bottom half of the housing and quite a few Qwik-cap housings have survived years under water although the flexing of that soft polymer limits them to shallower deployments. So these wide-body units get used primarily for drip loggers & surface climate stations. It’s worth noting that water vapour slowly migrates through the plastic knockout cap on the upper surface of our drip counters. So they require fresh desiccants once a year even though the logger could run much longer than that. A reminder that over the time scales needed for environmental monitoring, many materials one thinks of as ‘waterproof’ are not necessarily vapour proof.

For underwater deployments we developed a more compact screw-terminal build that would fit vertically into a 2″ cylindrical body. After many struggles with salt water corrosion we gave up on ‘marine grade’ stainless steel and started using nylon bolts to compress the O-ring. But these need to be tightened aggressively as nylon expands in salt water (we usually pre-soak the bolts overnight in a glass of water before sealing). Nylon expansion has also caused problems with the thick 250lb ties we use to anchor the loggers. In a high humidity environments, cheap nylon zip ties become brittle and break, while expensive industrial ties stretch and become loose. We’re still looking for better options but when you are working under water, you need something that can be deployed quickly.

We’ve tried many different epoxy / mounting combinations on the upper cap of those housings, but with the exception of display screens we stopped using the larger wells for underwater units because the wide flat disk of epoxy flexes too much under pressure. This torsion killed several sensor ICs on deployments below 10m even though the structure remained water-tight.

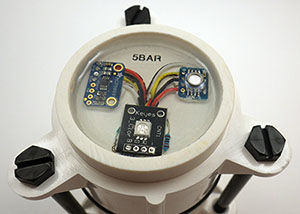
As our codebase (and my soldering skills) improved we were able to run with fewer batteries – so the loggers became progressively smaller over time. Current housings are made from only two Formufit table leg caps and ~5cm of tubing. The same swivel adapter used in our underwater connector now joins sensor dongles to the housing via threaded plugs. Sensor combinations can be changed easily via the Deans micro connectors we’ve used since the beginning of the project. Though the photo shows two stacked o’rings, we now use shorter bolts and only one. See this post for more details on the construction of this housing.
EPDM O-rings lose much of their elasticity after a couple of years compressed at 20-25m, so for deeper deployments I’d suggest using a more resilient compound. And there are now pre-made metal housing options in the ROV space that didn’t exist at the start of this project. With the dramatic size reduction in recent models, you occasionally find a good deal on older Delrin dive-light housings on eBay. Another interesting option is household water filter housings made from clear acrylic. They were too bulky for our diving installations, but this Sensor Network project at UC Berkeley illustrates their use as surface drifters.
Other Protection Methods
Mineral oil: PC nerds have been overclocking in tanks of mineral oil for ages, so it’s safe at micro-controller voltages. It’s also used inside ROV’s with a flexible diaphragm to compensate for changes in volume under pressure. Usually a short length of Tygon tubing gets filled with oil and stuck out into the water, or the tube can be filled with water and penetrates into the oil-filled housing. We use a similar idea to protect our pressure sensors from salt water:


Moving those membrane-protected sensors onto a remote dongle makes it much easier to recover the sensor after a unit gets encrusted with critters. Oil mounts have worked so well protecting those delicate MS58 gel-caps that I’ve now started using this method with regular barometric sensors like the BMP280. This adds thermal lag but there’s no induced offset in the pressure readings provided there’s enough slack in the membrane. Silicone oil is another option, and I’ve been wondering about adding dye so that it’s easier to spot when those membranes eventually fail. I avoid immersing any components with paper elements, like some old electrolytic capacitors, or parts that have holes for venting.


Cable Protection: For the most part this comes down to either strain relief, or repairing cuts in the cable jacket. Air curing rubbers like Sugru are fantastic for shoring up worn cables where they emerge from a housing though I usually use plumbers epoxy putty for that because I always have it on hand for the housing construction. Sugru is far less effective at repairing cables than something that’s cheaper but less well known: self-fusing rubber electrical sealing tape (often called ‘mastic’ or ‘splicing’ tape). This stuff costs about $5 a roll and has no adhesive: when you wind it around something it sticks to itself so aggressively that it can not be unstuck afterward, yet remains flexible in all directions. This makes it perfect for repairs in the middle of a cable and we’ve seen it last months under water though it quickly becomes brittle under direct sun. And it does the job in places you can’t reach with adhesive lined heat shrink. I usually slap a coat of plasti-dip or liquid electrical tape over top of those repairs. This improves the edge seal and makes the patch look better. Self-fusing tape is also great for bulking out cables that are too thin for an existing cable gland, or combining several wires into a water-tight round-profile bundle for a single gland.
However the best advice I can give is to simply avoid the temptation of soft silicone jacket cables in the first place. Yes, they handle like a dream under water, but you will pay for it in the long run with accidental cuts and hidden wire breaks due to all that flexing. Another hidden gotcha is that silicone compresses at depth which brings the wires closer together – potentially increasing the capacitance of a long bus enough to interfere with sensor handshakes. Our go-to after many years at the game is harder polyurethane jacketed cables (like the ones Omega uses for their thermistors) It’s a pain in the arse to strip & solder, but you can pretty much drive a truck over it. And somehow that kind of thing always happens at least once during a field season.

Double housings: Instead of sealing the housing to block out humidity, control the point where it condenses by surrounding an inner plastic housing with a second outer shell made of aluminum. Then let everything breathe naturally with the idea that condensation will happen first on the faster cooling aluminum, thereby protecting the inner components. I’ve heard of this being used for larger commercial monitoring stations but I’ve never been brave enough to try it myself. You want some kind of breathable fabric membrane over any vent holes to keep out dust (to IP6) and especially insects because if there’s a way into your housing they will find it and move in. Another simple but related trick is to fill any void spaces inside your housing with blocks of styrofoam: this minimizes the total volume of air exchanged when the temperature swings.
Addendum 2023-05-24: Testing Underwater Housings
People reading this post might also be interested in the DIY pressure chamber which we’ve been using to test our little falcon tube loggers. It’s made from a household water filter canister, with a total cost of about $70usd. The domestic water pressure range of 40-80psi overlaps nicely with sport diving depths. The 30mL tubes are stronger for single sensor builds, but the 50mL tube provide more space for our 2-Module classroom data logger. This model uses two mini breadboards for convenient sensor swaps.

Addendum 2023-07-16:
There’s an interesting article on 3-d printed underwater housings over at the Prusa Research blog. I’d use a coating of CA glue with spray on accelerant to seal those outer surfaces.

Pingback: ICYMI – Adafruit IoT Monthly: Waterproofing your Projects, Jellyfish Umbrella, and more! « Adafruit Industries – Makers, hackers, artists, designers and engineers!
The effects of cleanliness on longevity can’t be understated. I spent the last 13 years studying contamination on electronics reliability. I’ve seen so many people either skip the cleaning or even worse go with overly aggressive solder flux (aka what was the cheapest) which leads to electrochemical migration (small metal dendrites that short things out)
Pingback: ICYMI – Adafruit IoT Monthly: The 2023 Recap Issue! « Adafruit Industries – Makers, hackers, artists, designers and engineers!
Pingback: The 2023 Recap Issue! « Adafruit Industries – Makers, hackers, artists, designers and engineers! - Newest Tech Trends